Docker
Installing TAKAKRYPT Using Docker
Introduction
This guide explains the process of installing TAKAKRYPT using Docker through an automated installer. The installer supports two installer sources:
- Image Registry (Online Deployment): The Docker image is downloaded from a registry using an internet connection.
- Local Image (Offline Deployment): The Docker image is loaded from a local file without requiring an internet connection.
Once the installation process is complete, the administrator can perform system activation, administrator account registration, and TAKAKRYPT license activation.
Prerequisites
Ensure the following requirements have been met before starting the installation:
- Linux or Windows operating system
- sudo or root access privileges
- Installer file
- Domain or hostname that has been pointed to the server
- HTTP (80) and HTTPS (443) ports available
- Docker image or access to the Docker Registry according to the chosen deployment method
- A valid TAKAKRYPT license
Installation Steps
Step 1: Access the Server
Access the Linux server using SSH from your local computer.
ssh <username>@<server-ip>Example:
ssh dummy@192.100.50.100Enter the SSH password according to the server configuration.
Step 2: Verify the Installer File
Ensure the installer file is available on the server.
Verify the presence of the installer file:
lsEnsure the installer file is available before proceeding to the next stage.
Step 3: Grant Execute Permission
Before running the installer, grant execute permission to the installer file so that it can be run as a program.
chmod u+x <nama file installer>Verify that execute permission has been successfully granted:
ls -l <nama file installer>Step 4: Run the Installer
Run the installer using administrator access privileges:
sudo ./<nama file installer> installStep 5: Enter the Server Password
The system will request the sudo password:
[sudo] password for user:Enter the server password to continue the installation process.
Step 6: Docker Engine Installation
The installer will display the following question:
Install Docker Engine? (Y/n)Choose:
- Y: to install Docker Engine automatically.
- n: if Docker Engine is already available on the server.
If the file /etc/apt/keyrings/docker.gpg already exists on the server, the installer will display the option:
File '/etc/apt/keyrings/docker.gpg' Overwrite? (y/N)Choose:
- y: Overwrite the old file with the new file.
- N: Keep the old file as is.
Docker Image Configuration
Step 7: Select the Image Source
Select the installer file source that will be used:
Select Image Source:
1. Image Registry
2. Local Image| Image Source | Description |
|---|---|
| Image Registry | Downloads the image from a registry using an internet connection |
| Local Image | Uses a local image without an internet connection |
Step 8: Image Registry (Online Deployment)
If you choose Image Registry, proceed to the following step.
Private Docker Hub Configuration
Use Private Docker Hub (yes/no)Choose:
- yes: to use the TAKAKRYPT Private Docker Registry.
- no: to use another registry according to your configuration.
Docker Registry Login
Enter the Docker Registry credentials:
Docker Username:
Docker Password:
Once authentication is successful, the installer will perform the process of pulling the image from the registry.
Step 8: Local Image (Offline Deployment)
If you choose Local Image, proceed to the following step.
Specify the Docker Image Location
Enter the directory where the Docker image is stored:
Input Image Directory Path:Load Docker Image
The installer will request confirmation:
Load These Docker Images? (y/n)Choose:
- y: to load all Docker images into the Docker Engine.
- n: to cancel the image load process.
If you choose y, the installer will automatically import the images into Docker.
Application Configuration
Step 9: Website Domain Configuration
Enter the domain or hostname that will be used to access the application:
Input Domain Name: <yourdomain.com>Step 10: SMTP Configuration
Configure SMTP Now? (Y/n)Choose:
- Y: to perform SMTP configuration.
- n: to skip SMTP configuration.
If you choose n, the installer will proceed directly to the JWT Secret configuration.
Step 11: JWT Secret Configuration
Enter the JWT Secret that will be used by the application:
Input JWT Secret:Step 12: JWT Secret Confirmation
Confirm saving this JWT Secret? (Y/n)Choose:
- Y: to continue the installation process.
- n: to cancel the installation process.
Step 13: SSL Configuration
SSL Configuration:
1. Use Existing Certificate
2. Generate Self-Signed Certificate| SSL Configuration | Description |
|---|---|
| Use Existing Certificate | Uses an SSL certificate that is already available |
| Generate Self-Signed Certificate | Creates an SSL certificate automatically |
Step 14: Service Deployment
After selecting the SSL configuration using Generate Self-Signed Certificate, the installer will automatically:
- Create the SSL Certificate (if using Generate Self-Signed Certificate).
- Create the docker-compose.yml configuration file.
- Verify the deployment configuration.
- Pull the image from the Docker Registry or load the image from local storage according to the chosen deployment method.
- Create the Docker Volumes required by the application.
- Run all TAKAKRYPT containers.
- Display the status of the services that have been successfully run.
If the deployment process is successful, the TAKAKRYPT application is ready to be accessed through the domain that was previously configured.
System Activation
Step 15: Access the TAKAKRYPT Website
Open a browser and access the domain that has been configured:
Access your website at: https://yourdomain.comStep 16: Generate Share Key
After successfully accessing the page, configure the Share Key by filling in the following information:
- Total of Share Key: Specify the number of Share Keys to be created (minimum 5 keys).
- Threshold: Specify the minimum number of Share Keys required to reconstruct the secret (minimum 3 keys).

If needed, check the Send keys to email option to send the Keys via the configured email.
Once all information has been filled in, click the Generate Share Key button to generate the Keys.
Step 17: Save the Share Keys
After the Share Keys have been successfully created, the system will display all the Keys generated based on the previous configuration.
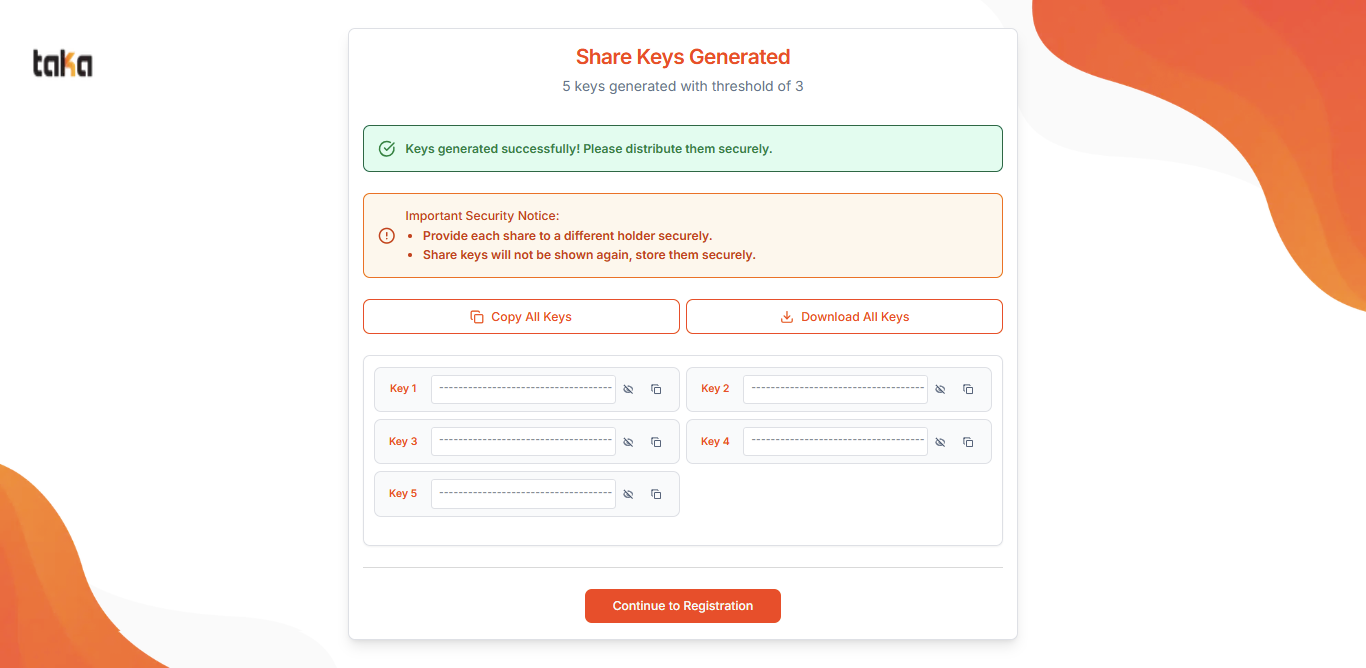
On the Share Keys Generated page, perform one of the following actions:
- Click Copy All Keys to copy all the Keys.
- Click Download All Keys to download all the Keys to your local device.
- Store all Keys in a secure location.
- Keys that have been displayed will not be displayed again by the system.
Once all Keys have been successfully saved, click Continue to Registration to proceed to the administrator registration process.
Step 18: Administrator Registration
Complete the following information on the registration page:
- First Name: The Administrator's first name.
- Last Name: The Administrator's last name.
- Company Name: The name of the company or organization that will use TAKAKRYPT.
- Email: The Administrator's email address that will be used as the username to log in to the system.
- Password: The password that will be used for Administrator account authentication.
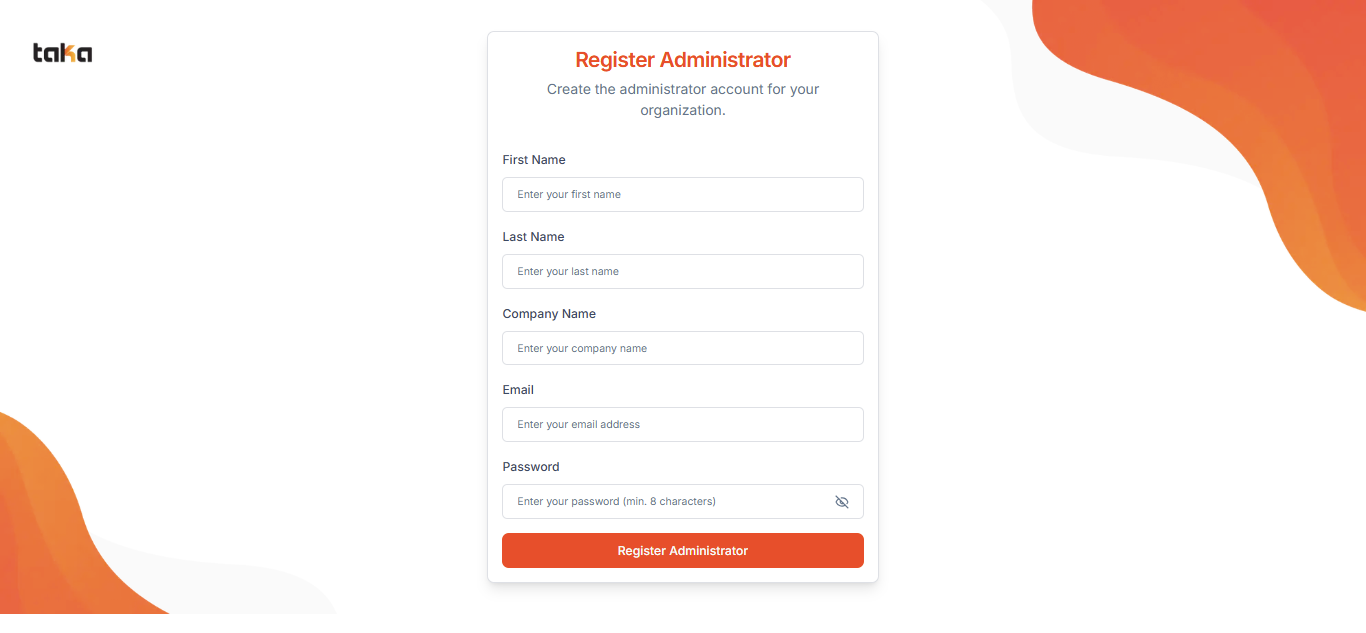
- Use an active and accessible email address.
- The password should use a combination of uppercase letters, lowercase letters, numbers, and special characters to increase account security.
- The account created at this stage will become the first Administrator account with full access to the configuration and management of the TAKAKRYPT system.
Once all information has been filled in correctly, click the Register Administrator button to complete the Administrator account creation process.
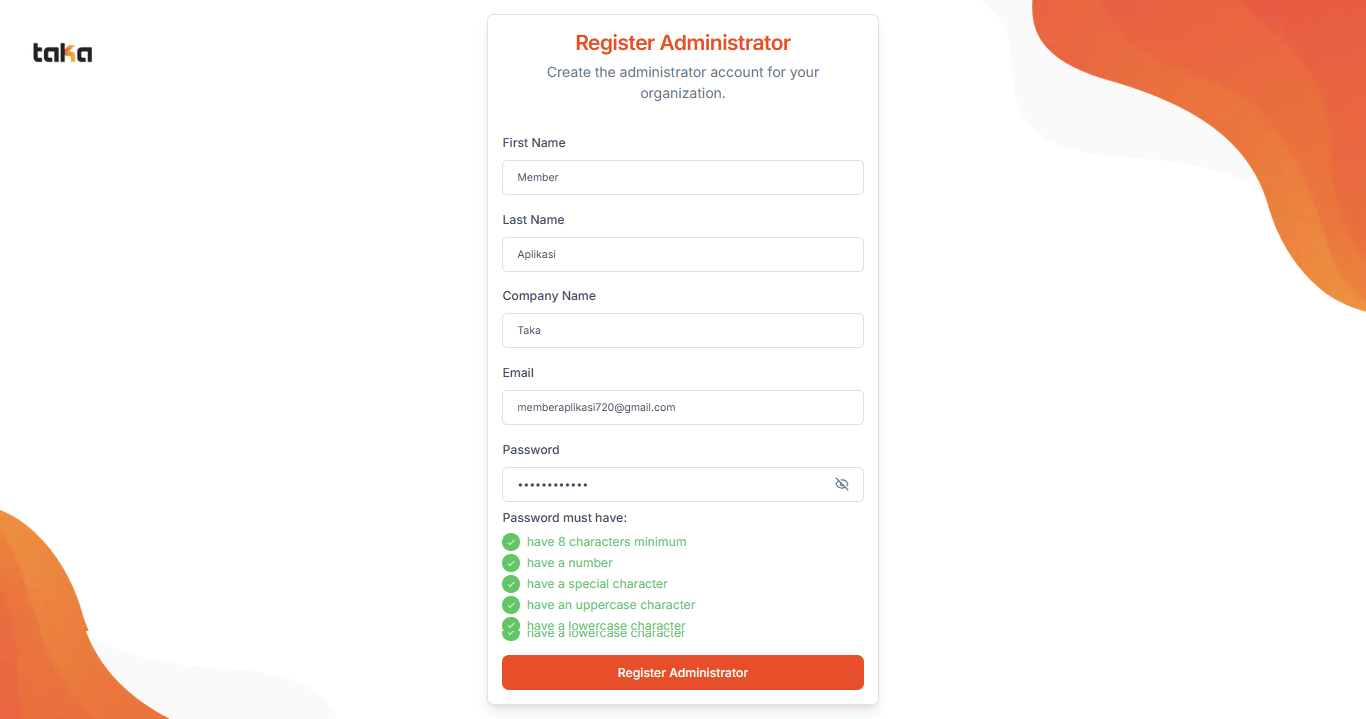
Once the registration process is successful, the system will display the Setup Complete page, indicating that the initial configuration of TAKAKRYPT has been completed.

Step 19: Unlock System
Enter the unlock key that was obtained earlier to unlock access to the TAKAKRYPT system.
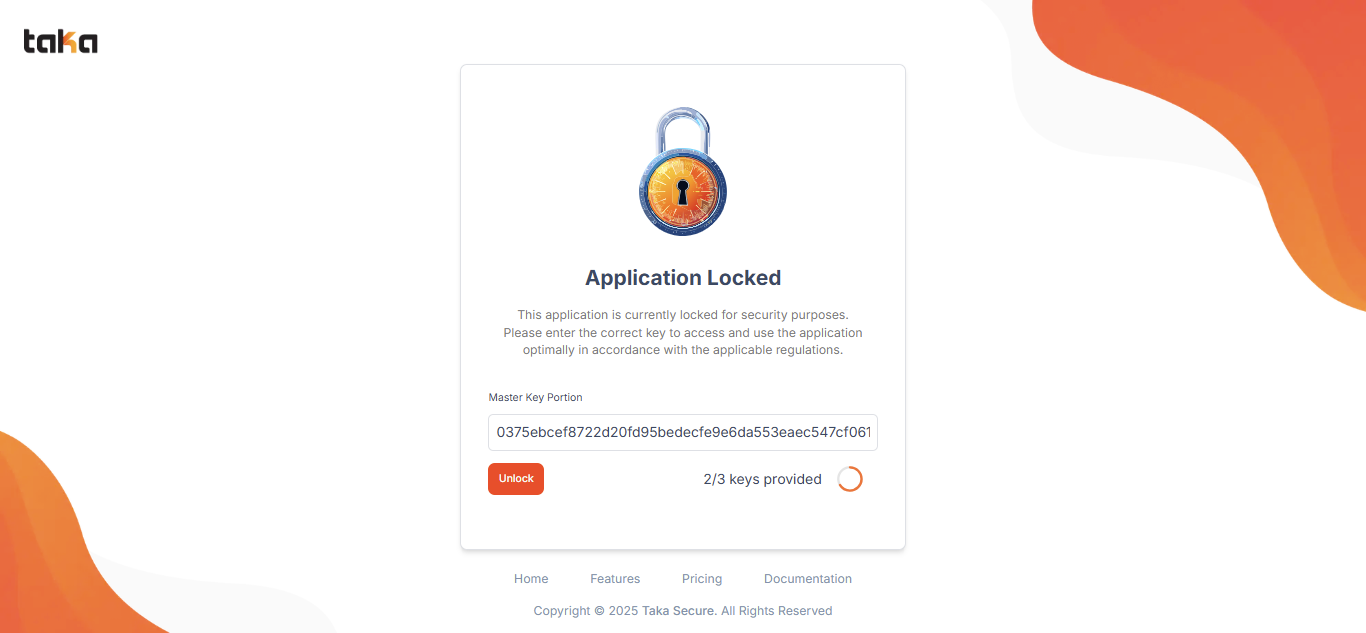
Step 20: Login to the Dashboard
Log in using the Administrator account that was created during the previous registration process by entering the registered email address and password.

Once login is successful, the system will display the TAKAKRYPT Dashboard page as the main page of the application.
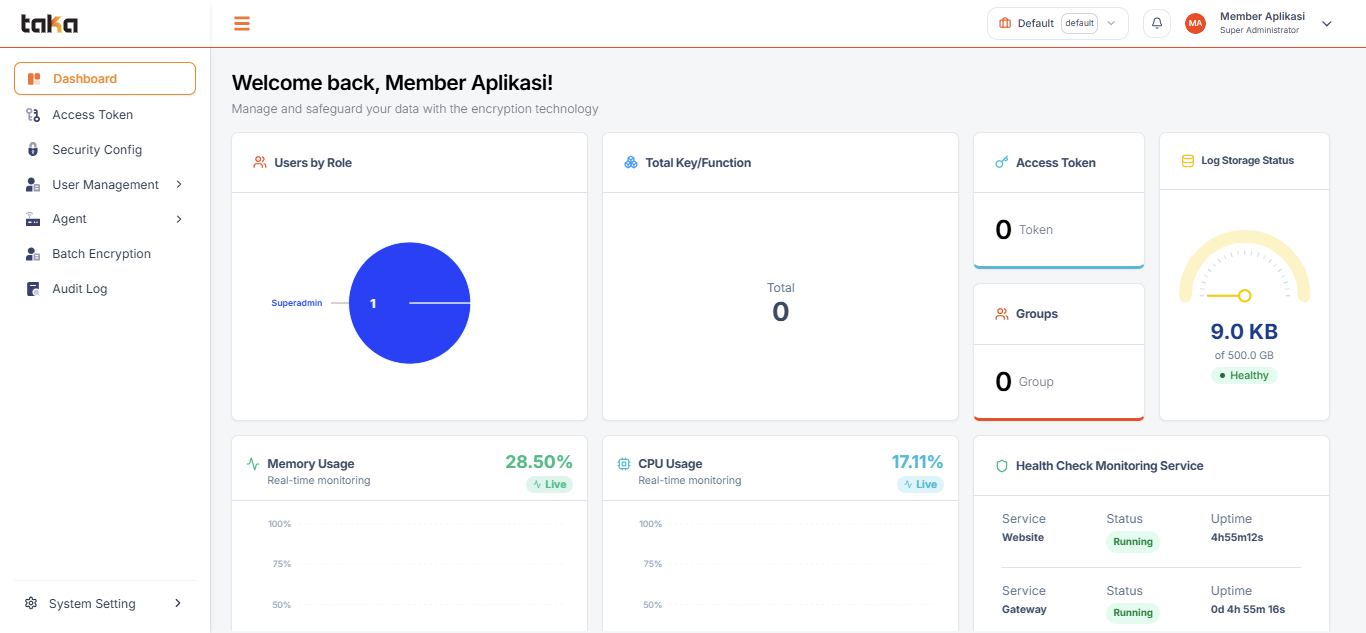
Step 21: License Activation
To use all TAKAKRYPT features, the Administrator needs to activate the license first. License activation can be performed through the System Settings → License menu on the TAKAKRYPT Dashboard.
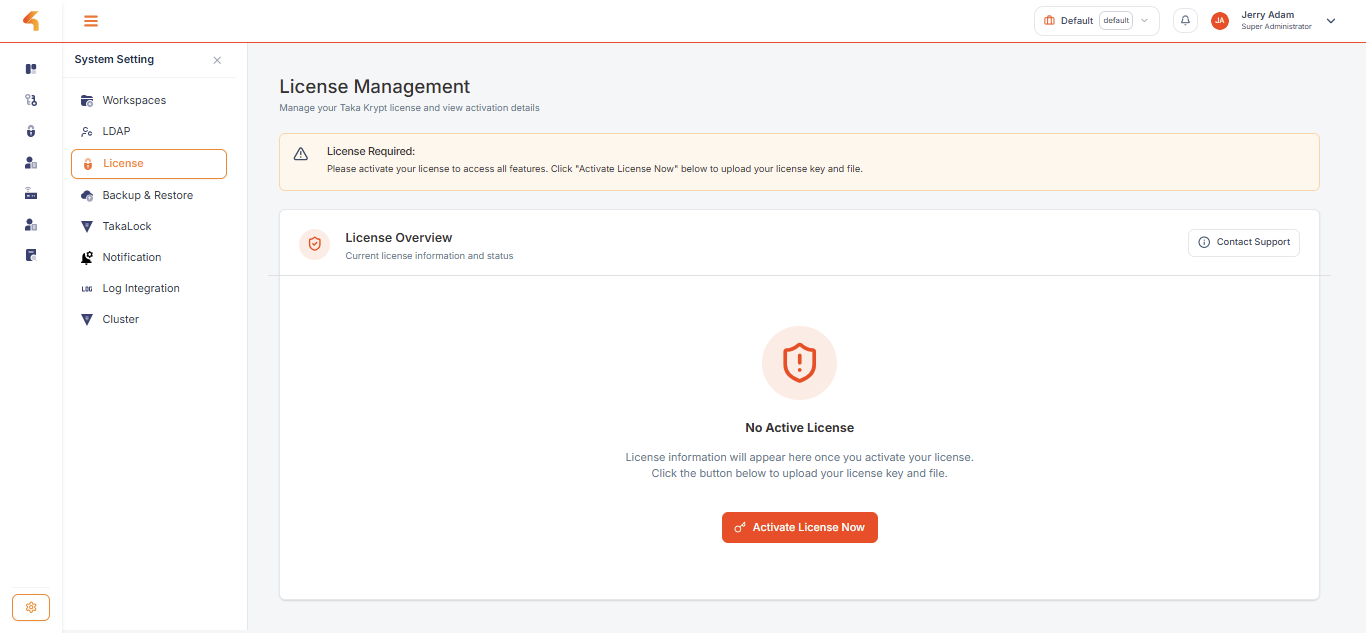
Click Activate License Now on the License Management page.
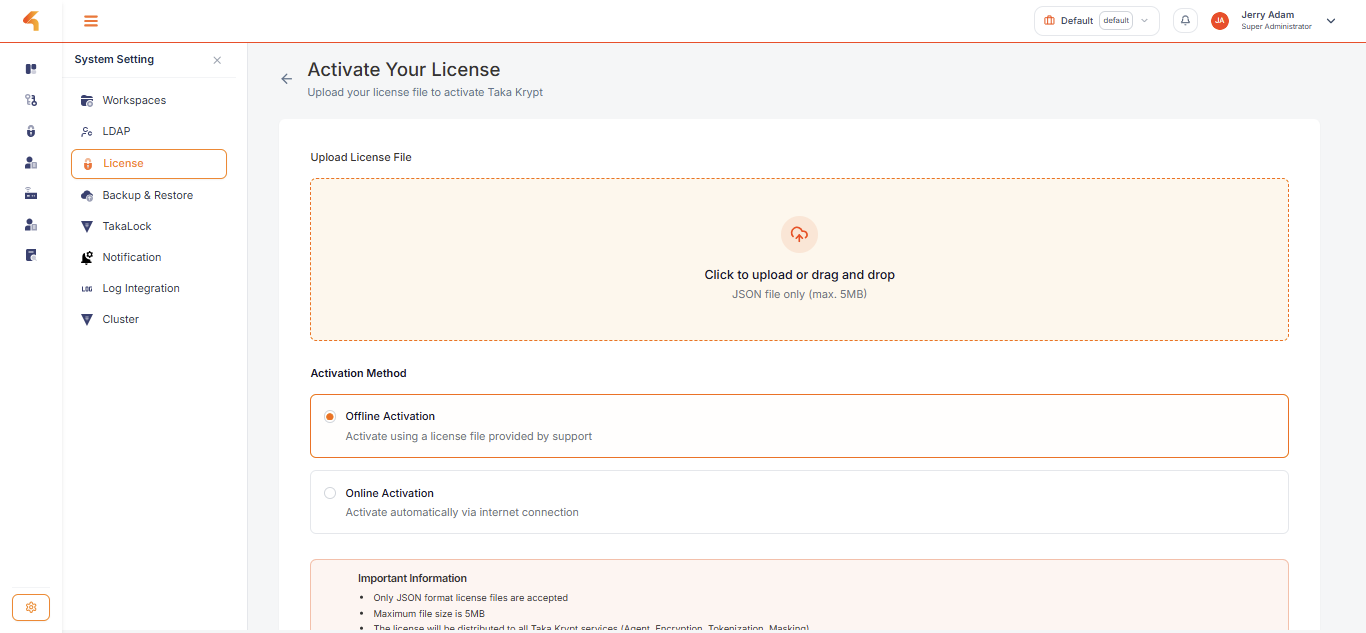
On the Active Your License page, upload the license file using the JSON format and select the appropriate activation method:
- Offline Activation to perform activation using the license file provided by the support team.
- Online Activation to perform activation automatically through an internet connection.
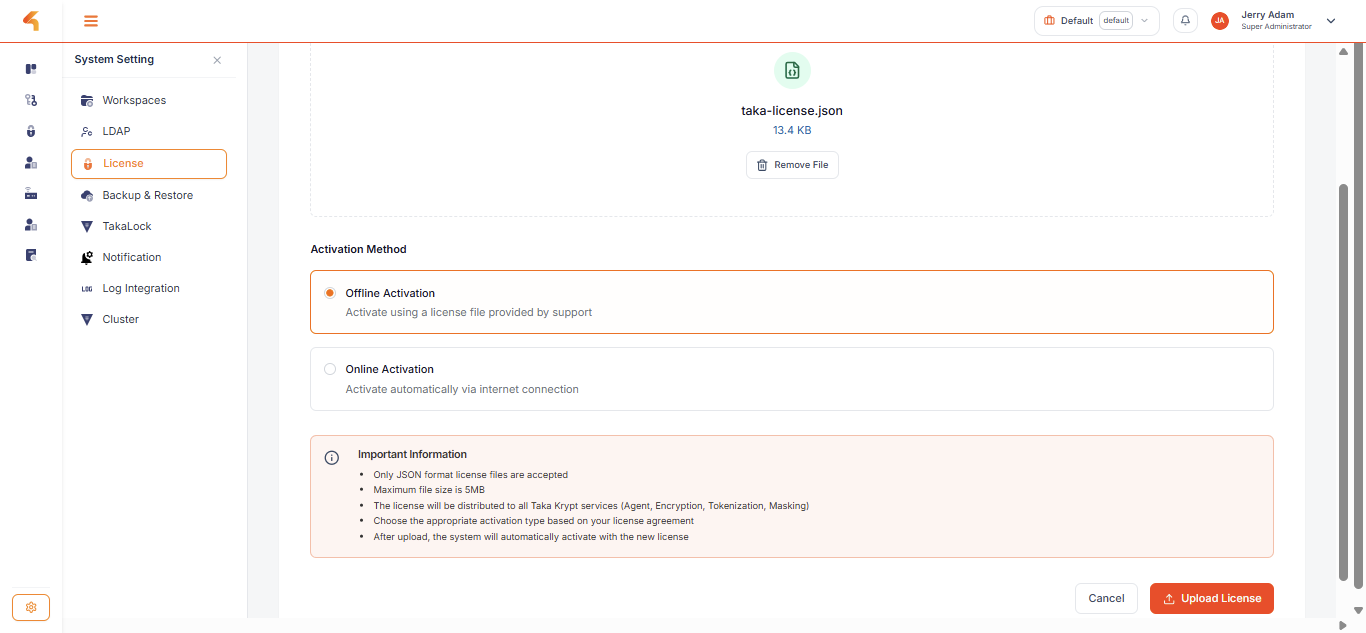
Once the license file has been successfully uploaded, click the Upload License button to begin the activation process. The system will perform verification and distribute the license to all integrated TAKAKRYPT services.
Once the license activation process is successful, all TAKAKRYPT features and services will be active and ready to use. The Administrator can then configure, manage, and operate TAKAKRYPT features according to the organization's needs and the applicable security policies.
Conclusion
The TAKAKRYPT installation using Docker is now complete. The installer supports both online deployment via the Docker Registry and offline deployment using a local image, allowing it to be tailored to an organization's infrastructure needs and policies.